Imagine this: you're sitting in your cozy living room, sipping coffee, and suddenly you remember that you need to check on your Raspberry Pi-powered IoT device in your garage. No problem! With the best SSH to IoT device for Raspberry Pi, you can access and manage your setup remotely without lifting a finger to physically touch the hardware. It's like having a digital key that lets you unlock the full potential of your smart devices from anywhere in the world. Whether you're a hobbyist or a professional developer, mastering SSH for Raspberry Pi is a game-changer for your IoT projects.
SSH (Secure Shell) is more than just a buzzword in the tech world. It's the backbone of secure communication between devices, and when paired with Raspberry Pi, it becomes an indispensable tool for IoT enthusiasts. This article will guide you through the ins and outs of using SSH for your Raspberry Pi-based IoT projects. We'll cover everything from setting up SSH to troubleshooting common issues, ensuring you're equipped with the knowledge to make the most out of your setup.
Before we dive into the nitty-gritty, let's quickly touch on why SSH is so important. In the realm of IoT, security is paramount. Without a secure connection, your devices are vulnerable to unauthorized access, which can lead to data breaches or even system failures. By using SSH, you're not only enabling remote access but also safeguarding your devices against potential threats. Now, let's get started!
Read also:Sone 436 The Ultimate Guide To Discovering The Fascinating World Of Sone 436
What is SSH and Why Use It for IoT Devices?
SSH stands for Secure Shell, and it's essentially a network protocol that allows you to securely connect to remote devices. Think of it as a secure tunnel that encrypts all communication between your computer and your IoT device. When it comes to Raspberry Pi, SSH is your go-to method for managing your device without needing a monitor, keyboard, or mouse.
Here’s why SSH is a must-have for your IoT projects:
- Security: SSH encrypts all data transmitted between your device and the server, ensuring that no one can intercept your sensitive information.
- Remote Access: With SSH, you can control your Raspberry Pi from anywhere in the world, as long as you have an internet connection.
- Efficiency: Managing your IoT devices via SSH is faster and more efficient than using a graphical interface, especially when dealing with command-line tasks.
- Automation: SSH enables you to automate tasks, such as running scripts or updating software, on your IoT devices without manual intervention.
In short, SSH is the backbone of secure and efficient IoT device management, and it's especially powerful when combined with the versatility of Raspberry Pi.
Setting Up SSH on Your Raspberry Pi
Step-by-Step Guide to Enabling SSH
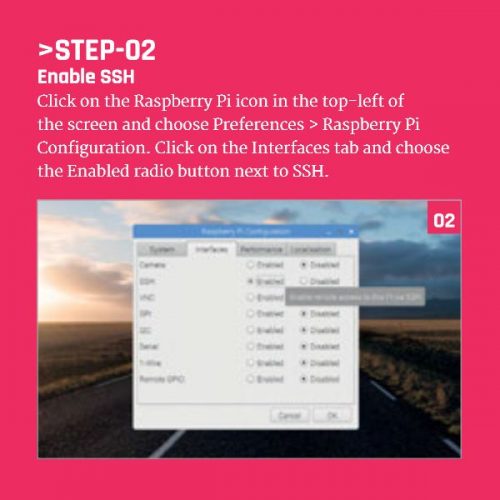
Enabling SSH on your Raspberry Pi is a straightforward process, but it requires a bit of setup. Here’s how you can do it:
- Boot Your Raspberry Pi: Start by booting up your Raspberry Pi with the latest version of Raspberry Pi OS installed.
- Access the Raspberry Pi Configuration Tool: Open the terminal and type `sudo raspi-config` to launch the configuration tool.
- Enable SSH: Navigate to the "Interfacing Options" menu, select SSH, and enable it. Confirm your choice by hitting "OK."
- Reboot Your Pi: After enabling SSH, reboot your Raspberry Pi to apply the changes.
And that's it! Your Raspberry Pi is now ready to accept SSH connections. But wait, there's more. To make sure everything is working as expected, let's test the connection.
Testing Your SSH Connection
How to Connect to Your Raspberry Pi via SSH
Once SSH is enabled, it's time to test the connection. Here's how you can connect to your Raspberry Pi from another computer:
Read also:Honeytoon Free Reading Your Ultimate Guide To Exploring Webtoons Without Limits
- Find Your Raspberry Pi's IP Address: Use the command `hostname -I` in the terminal to find the IP address of your Raspberry Pi.
- Install an SSH Client: On your computer, install an SSH client like PuTTY (for Windows) or use the built-in terminal (for macOS and Linux).
- Connect to Your Pi: Open the SSH client and enter the IP address of your Raspberry Pi. Use the default credentials (username: pi, password: raspberry) unless you've changed them.
If everything is set up correctly, you should now have a terminal session with your Raspberry Pi. Congratulations, you've successfully established an SSH connection!
Best SSH Clients for Raspberry Pi
Not all SSH clients are created equal. Depending on your operating system, you might want to consider using a specific client to maximize your productivity. Here are some of the best SSH clients for Raspberry Pi:
- Terminal (macOS/Linux): If you're using a macOS or Linux machine, the built-in terminal is all you need. It's fast, reliable, and completely free.
- PuTTY (Windows): PuTTY is a popular choice for Windows users due to its simplicity and ease of use. It's a lightweight client that gets the job done without any hassle.
- Termius (Cross-Platform): For those who want a more feature-rich experience, Termius is a great option. It offers a user-friendly interface and supports multiple platforms, including iOS and Android.
Choosing the right SSH client can make a big difference in your workflow, so take the time to experiment with different options to find what works best for you.
Securing Your SSH Connection
Best Practices for SSH Security
While SSH is inherently secure, there are additional steps you can take to further protect your Raspberry Pi and IoT devices:
- Change Default Credentials: The first thing you should do is change the default username and password to something more secure.
- Use Key-Based Authentication: Instead of relying on passwords, consider setting up key-based authentication. This method is more secure and eliminates the risk of brute-force attacks.
- Disable Root Login: Disabling root login adds an extra layer of security by preventing attackers from gaining administrative access to your device.
- Limit Access: Restrict SSH access to specific IP addresses or networks to minimize the risk of unauthorized access.
By following these best practices, you can ensure that your SSH connection remains secure and your IoT devices are protected from potential threats.
Troubleshooting Common SSH Issues
Even with the best setup, things can go wrong. Here are some common SSH issues and how to fix them:
- Connection Refused: This usually happens when SSH is not enabled or the firewall is blocking the connection. Double-check your SSH settings and ensure that the necessary ports are open.
- Permission Denied: If you're getting a "permission denied" error, it might be due to incorrect credentials or misconfigured permissions. Verify your username and password, and check the SSH configuration file for errors.
- Timeout Errors: Timeout errors often occur when there's a network issue or the IP address is incorrect. Make sure your Raspberry Pi is connected to the same network as your computer and verify the IP address.
With a bit of troubleshooting, you can overcome most SSH-related issues and get back to managing your IoT devices in no time.
Automating Tasks with SSH
How to Automate IoT Device Management
One of the most powerful features of SSH is its ability to automate tasks on your IoT devices. Whether it's running scripts, updating software, or monitoring system performance, SSH can handle it all. Here's how you can automate tasks using SSH:
- Create a Script: Write a bash script that contains the commands you want to execute on your Raspberry Pi.
- Set Up Cron Jobs: Use the `crontab` command to schedule your script to run at specific intervals.
- Test Your Automation: Run the script manually to ensure it works as expected before setting up the cron job.
Automation not only saves you time but also ensures that your IoT devices are always up-to-date and running smoothly.
Real-World Applications of SSH for IoT Devices
SSH isn't just a theoretical concept; it has real-world applications that can revolutionize the way you manage your IoT devices. Here are a few examples:
- Smart Home Automation: Use SSH to control smart home devices like lights, thermostats, and security systems from anywhere in the world.
- Remote Monitoring: Monitor environmental sensors, such as temperature and humidity, using SSH to access data in real-time.
- Industrial IoT: In industrial settings, SSH can be used to manage and monitor machines and equipment, ensuring optimal performance and reducing downtime.
The possibilities are endless, and with SSH, you have the tools to bring your IoT projects to life.
Conclusion
SSH is an essential tool for anyone working with IoT devices, especially when paired with the versatility of Raspberry Pi. From enabling remote access to automating tasks, SSH offers a wide range of benefits that can enhance your IoT projects. By following the steps outlined in this article, you can set up a secure and efficient SSH connection to your Raspberry Pi and take your IoT setup to the next level.
So, what are you waiting for? Dive into the world of SSH and unlock the full potential of your Raspberry Pi-based IoT devices. Don't forget to share your experiences and leave a comment below. Happy tinkering!
Table of Contents