Ever wondered how to remotely access IoT devices through SSH using a free AWS platform? Well, buckle up because this guide is about to blow your mind. In today's interconnected world, managing IoT devices from anywhere has become more than just a convenience—it's a necessity. Whether you're a tech enthusiast, a small business owner, or a developer, understanding how to remotely access IoT devices via SSH on AWS can revolutionize how you manage your tech infrastructure. Let me walk you through everything you need to know.
Picture this: you're chilling at home, and suddenly, you realize you forgot to update the firmware on one of your IoT devices located miles away. Panic sets in, but wait—what if you could fix it from your laptop without breaking a sweat? That’s where SSH (Secure Shell) comes into play. With AWS offering free-tier services, you don’t even have to break the bank to make this happen. This guide will show you exactly how to set it all up.
Now, before we dive deep into the nitty-gritty details, let's address the elephant in the room. Why should you care about remotely accessing IoT devices via SSH on AWS? Simple. It saves time, reduces costs, and enhances security. Plus, who doesn't love the idea of controlling their tech empire from the comfort of their couch? Let's get started.
Read also:Caramel Balayage The Ultimate Guide To This Stunning Hair Trend
Understanding SSH and Its Role in IoT
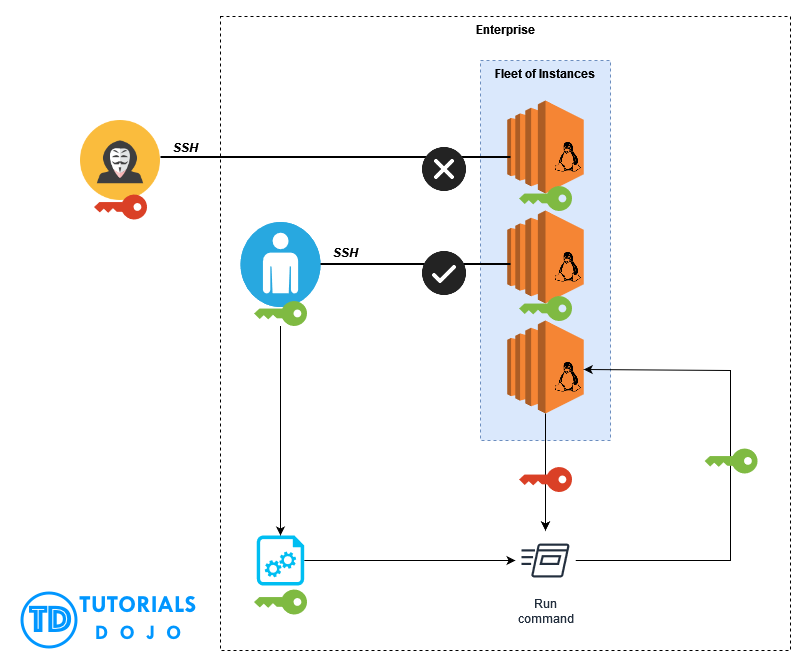
First things first, let's break down what SSH actually is. SSH stands for Secure Shell, and it's like a super-secure tunnel that lets you remotely access and control devices over a network. For IoT devices, SSH acts as the backbone for secure communication, ensuring that your data stays safe while you manage your gadgets from afar.
Here’s why SSH is such a game-changer for IoT:
- It provides encrypted communication, keeping prying eyes out.
- You can execute commands directly on the device as if you were physically there.
- It supports file transfers, so you can easily upload or download files to and from your IoT devices.
When it comes to IoT, SSH ensures that your devices remain secure and manageable, no matter where they are located. This is crucial when you're dealing with sensitive data or critical infrastructure.
Why Use AWS for Free IoT SSH Access?
AWS (Amazon Web Services) offers a free-tier service that’s perfect for small-scale projects or testing purposes. Using AWS for remotely accessing IoT devices via SSH gives you access to powerful cloud tools without the hefty price tag. Here's why AWS is the go-to platform:
First off, AWS is reliable. With its robust infrastructure, you can trust that your IoT devices will remain accessible even during peak usage times. Plus, AWS offers a ton of integrations, so you can easily connect your SSH setup with other tools and services.
Here’s a quick rundown of AWS’s benefits for IoT SSH access:
Read also:Texas Senate Passes Bill To Ban Thc Products What You Need To Know
- Free-tier access for up to 12 months, which is perfect for testing and small projects.
- Scalability, so you can grow your setup as your needs expand.
- Integration with other AWS services, like Lambda and S3, for enhanced functionality.
So, whether you're a hobbyist or a professional, AWS provides the tools you need to get the job done efficiently and securely.
Setting Up Your IoT Devices for SSH
Now that we’ve covered the basics, let’s talk about setting up your IoT devices for SSH access. This step is crucial because it ensures that your devices are ready to communicate securely with your AWS setup.
Here’s a step-by-step guide:
- Install an SSH server on your IoT device: Most IoT devices come with an SSH server pre-installed, but if not, you’ll need to install one. For example, on Raspberry Pi, you can enable SSH through the Raspberry Pi Configuration tool.
- Generate SSH keys: SSH keys are like digital passports that allow you to securely access your devices. Use tools like PuTTYgen or ssh-keygen to generate these keys.
- Configure firewall settings: Ensure that your device’s firewall allows SSH traffic (usually on port 22).
By following these steps, you’ll have your IoT devices ready for remote access via SSH. It’s like giving your devices a digital handshake that keeps them secure while allowing you to manage them from anywhere.
Choosing the Right IoT Devices
Not all IoT devices are created equal. When selecting devices for SSH access, consider factors like processing power, memory, and connectivity options. Devices like Raspberry Pi, ESP32, and Arduino are popular choices due to their affordability and versatility.
Here’s a quick comparison:
- Raspberry Pi: Great for more complex tasks, with plenty of processing power and memory.
- ESP32: Ideal for smaller projects, offering Wi-Fi and Bluetooth connectivity.
- Arduino: Perfect for simple projects, though it may require additional hardware for SSH support.
Choosing the right device depends on your specific needs and budget. No matter which one you pick, make sure it supports SSH out of the box or can be easily configured to do so.
Creating an AWS Account and Setting Up Free Tier
Alright, let’s move on to the AWS side of things. Creating an AWS account and setting up the free tier is surprisingly straightforward. Here’s how you can do it:
- Sign up for an AWS account: Head over to the AWS website and create a new account. It’s free to sign up, and you’ll get access to the free-tier services for the first 12 months.
- Verify your account: AWS will ask for your payment details, but don’t worry—you won’t be charged unless you exceed the free-tier limits.
- Launch an EC2 instance: EC2 (Elastic Compute Cloud) is AWS’s virtual server service. You’ll use it to create a virtual machine that will act as the bridge between your IoT devices and the internet.
Once your EC2 instance is up and running, you’ll have a secure platform to connect your IoT devices via SSH. It’s like having your own private server in the cloud, ready to handle all your IoT needs.
Configuring Security Groups for SSH Access
Security groups in AWS act as virtual firewalls that control access to your EC2 instances. To allow SSH access, you’ll need to configure these groups properly. Here’s how:
- Create a new security group: In the AWS Management Console, navigate to the EC2 dashboard and create a new security group.
- Add an inbound rule for SSH: Set the source to "Anywhere" (or a specific IP address if you prefer) and the port to 22.
- Save your changes: Once you’ve added the rule, save your security group settings.
With your security groups configured, your EC2 instance will be ready to accept SSH connections from your IoT devices. It’s like setting up a digital bouncer that only lets authorized visitors in.
Connecting IoT Devices to AWS via SSH
Now that your IoT devices and AWS setup are ready, it’s time to connect them via SSH. This is where the magic happens. Here’s how you can do it:
- Obtain the public IP address of your EC2 instance: You’ll need this to connect to your instance from your IoT devices.
- Use an SSH client: Tools like PuTTY (for Windows) or the built-in terminal (for macOS and Linux) can be used to establish the connection.
- Enter your SSH credentials: Use the private key you generated earlier to authenticate the connection.
Once connected, you’ll have full access to your IoT devices as if you were sitting right next to them. It’s like having a digital teleportation device for your tech gadgets.
Enhancing Security with SSH Key Pairs
Using SSH key pairs instead of passwords adds an extra layer of security to your setup. Here’s how to implement them:
- Generate a key pair: Use ssh-keygen to create a public and private key.
- Upload the public key to your IoT device: This allows the device to recognize your SSH client.
- Store the private key securely: Keep it in a safe location, as it’s the key to accessing your devices.
With SSH key pairs in place, you’ll significantly reduce the risk of unauthorized access to your IoT devices. It’s like having a digital lock that only you can open.
Monitoring and Managing IoT Devices via SSH
Once your IoT devices are connected to AWS via SSH, it’s time to start managing and monitoring them. Here’s what you can do:
Execute commands: You can run commands directly on your IoT devices, whether it’s checking system status, updating firmware, or troubleshooting issues.
Transfer files: Use tools like SCP (Secure Copy Protocol) to transfer files between your devices and your local machine.
Set up automation: Use scripts to automate repetitive tasks, saving you time and effort.
Managing your IoT devices via SSH is like having a remote control for your entire tech ecosystem. With the right tools and techniques, you can keep everything running smoothly from anywhere in the world.
Troubleshooting Common SSH Issues
Even the best setups can run into issues. Here are some common SSH problems and how to fix them:
- Connection refused: Check your security group settings and ensure that port 22 is open.
- Authentication failure: Double-check your SSH keys and make sure they’re correctly configured.
- Timeout errors: Ensure that your network connection is stable and that there are no firewall restrictions blocking the connection.
By addressing these issues promptly, you’ll ensure that your SSH setup remains reliable and secure.
Scaling Your IoT SSH Setup on AWS
As your IoT infrastructure grows, you may need to scale your SSH setup on AWS. Here’s how you can do it:
Use Auto Scaling: AWS Auto Scaling allows you to automatically adjust the number of EC2 instances based on demand, ensuring that your setup remains efficient and cost-effective.
Implement Load Balancing: Distribute incoming traffic across multiple instances to prevent overload and improve performance.
Utilize AWS Lambda: For tasks that require minimal processing, AWS Lambda can handle them without the need for a full EC2 instance.
Scaling your IoT SSH setup on AWS is like building a digital fortress that can handle anything you throw at it. With the right tools and strategies, you can grow your setup as your needs expand.
Cost Management Tips
While AWS offers a free-tier service, it’s important to manage costs as your setup grows. Here are some tips:
- Monitor usage: Keep an eye on your AWS usage metrics to ensure you stay within the free-tier limits.
- Terminate unused instances: Shut down any instances you’re not actively using to save resources.
- Optimize instance types: Choose the right instance type for your needs to avoid unnecessary costs.
By managing your costs effectively, you’ll ensure that your IoT SSH setup remains affordable and sustainable.
Conclusion
In this guide, we’ve explored how to remotely access IoT devices via SSH on a free AWS platform. From understanding SSH and its role in IoT to setting up your devices and configuring AWS, we’ve covered everything you need to know to get started.
Here’s a quick recap of the key points:
- SSH provides secure and reliable access to your IoT devices.
- AWS offers a free-tier service that’s perfect for small-scale IoT projects.
- Setting up your devices and configuring AWS is straightforward with the right tools and techniques.
Now that you have the knowledge and tools to remotely access your IoT devices via SSH on AWS, it’s time to take action. Whether you’re managing a single device or an entire network, this setup will save you time, money, and headaches.
So, what are you waiting for? Get out there and start managing your IoT empire like a pro. And don’t forget to share this guide with your friends and colleagues. Together, let’s revolutionize how we interact with technology!
Table of Contents