So, here's the deal—remote IoT setups on Raspberry Pi using AWS Free Tier services are becoming the talk of the town. If you're looking to create a secure and scalable VPC (Virtual Private Cloud) network for your IoT devices without breaking the bank, you've come to the right place. Let's dive into how you can set up a remote IoT VPC network using Raspberry Pi and take advantage of AWS's free resources to make it happen.
Imagine having a system where your smart devices communicate seamlessly over the internet, all while staying secure. That's what we're building here. This isn't just about connecting gadgets; it's about creating a robust infrastructure that can handle data exchange in real time. Whether you're a hobbyist or a pro, this guide will help you get started with remote IoT VPC networks.
By the end of this article, you'll not only understand the basics but also have a working setup that's efficient, secure, and scalable. Ready? Let's roll!
Read also:Michael Dunlop Net Worth A Comprehensive Look At The Racing Legends Wealth And Career
Table of Contents
- Introduction to RemoteIoT VPC Network
- Setting Up Your Raspberry Pi
- Exploring AWS Free Tier for IoT
- Creating a VPC Network
- Securing Your IoT Devices
- Managing IoT Data
- Troubleshooting Common Issues
- Scaling Your IoT Setup
- Optimizing Performance
- Wrapping It Up
Introduction to RemoteIoT VPC Network
Alright, let's break it down. A RemoteIoT VPC network allows your IoT devices to communicate securely over the internet. Think of it like a private highway for your gadgets, where only authorized vehicles—ahem, devices—are allowed to pass. This setup is crucial if you're serious about building a scalable and secure IoT system.
Using Raspberry Pi as your gateway and AWS Free Tier services to host your VPC network is a game-changer. You don't need to spend a fortune on cloud services, and you can still enjoy all the benefits of AWS's powerful infrastructure. Plus, it's super easy to get started if you follow the right steps.
Here's the kicker: With the AWS Free Tier, you can experiment with IoT projects for up to a year without worrying about costs. That's plenty of time to test, refine, and even scale your setup. So, whether you're monitoring your home's temperature or controlling smart lights, this setup has got you covered.
Setting Up Your Raspberry Pi
First things first, you'll need a Raspberry Pi. Any model will do, but the newer ones come with better specs, so they're worth considering. Once you've got your Pi, follow these steps to get it ready:
What You'll Need
- Raspberry Pi (preferably Pi 4 or later)
- MicroSD card with Raspberry Pi OS installed
- Power supply and peripherals (keyboard, mouse, monitor)
- Network connectivity (Wi-Fi or Ethernet)
Once you've got everything, boot up your Pi and make sure it's connected to the internet. Update your OS by running these commands:
sudo apt update && sudo apt upgrade
Read also:Nick Kyrgios Wins First Match Since 2022 At Miami Open
This ensures your system is up to date and ready for the next steps.
Exploring AWS Free Tier for IoT
Now, let's talk about AWS Free Tier. This is where the magic happens. With AWS, you can create a VPC network, manage IoT devices, and even store data—all for free (for the first year). Here's what you get:
- 750 hours per month of EC2 and RDS usage
- 5 GB of S3 storage
- Unlimited IoT Core messages (up to a certain limit)
Signing up is simple. Just head over to the AWS website, create an account, and activate the Free Tier. Once you're in, you'll have access to all the tools you need to build your IoT setup.
Creating a VPC Network
A VPC network is like a sandbox for your IoT devices. It keeps everything secure and isolated from the rest of the internet. Here's how you can create one:
Step 1: Navigate to the VPC Dashboard
Log in to your AWS account and head over to the VPC dashboard. From there, select "Create VPC."
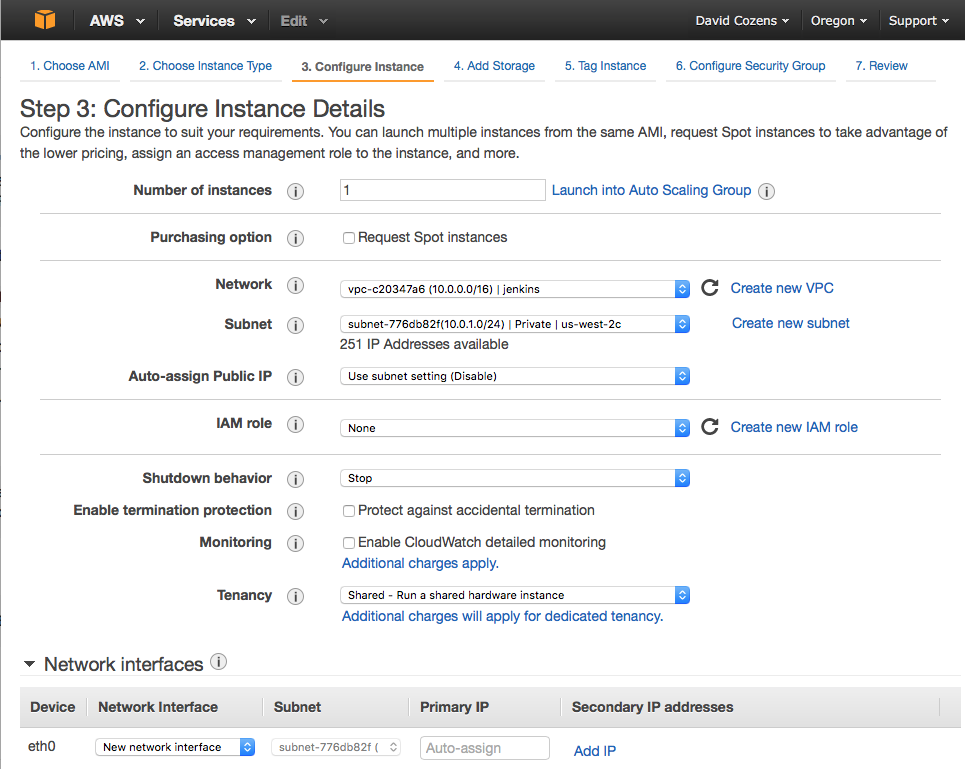
Step 2: Configure Your VPC
Give your VPC a name and set up the IP address range. For most projects, the default settings should work just fine. Just make sure to enable DNS resolution and hostname support.
Step 3: Add Subnets
Subnets allow you to divide your VPC into smaller segments. Create at least one public subnet and one private subnet for your IoT devices.
Securing Your IoT Devices
Security is key when it comes to IoT. You don't want unauthorized access to your devices or data leaks. Here's how you can secure your setup:
- Use strong passwords and enable two-factor authentication.
- Set up firewalls and security groups to control inbound and outbound traffic.
- Encrypt your data using SSL/TLS certificates.
By following these best practices, you'll ensure that your IoT devices are as secure as possible.
Managing IoT Data
Data is the lifeblood of any IoT system. With AWS, you can easily store, process, and analyze your data. Here's how:
Using S3 for Storage
S3 is a simple storage service that lets you store data in the cloud. You can use it to store logs, sensor readings, or any other data generated by your IoT devices.
Using Lambda for Processing
Lambda allows you to run code without provisioning or managing servers. You can use it to process data in real time and trigger actions based on specific conditions.
Troubleshooting Common Issues
Let's face it—things don't always go as planned. Here are some common issues you might encounter and how to fix them:
- Connection Problems: Make sure your Raspberry Pi is connected to the internet and that your AWS resources are properly configured.
- Data Loss: Check your S3 buckets and ensure that your data is being stored correctly.
- Security Alerts: Review your security groups and firewalls to ensure everything is set up properly.
Scaling Your IoT Setup
As your IoT project grows, you might need to scale your setup. AWS makes this easy with features like auto-scaling and load balancing. Here's how you can scale your system:
Using Auto-Scaling
Auto-scaling allows you to automatically adjust the number of instances based on demand. This ensures that your system can handle spikes in traffic without compromising performance.
Using Load Balancing
Load balancing distributes traffic across multiple instances, improving performance and reliability. It's a must-have for any large-scale IoT setup.
Optimizing Performance
To get the most out of your setup, you'll want to optimize performance. Here are a few tips:
- Use caching to reduce latency and improve response times.
- Monitor your system using AWS CloudWatch to identify bottlenecks.
- Optimize your code to reduce resource usage and improve efficiency.
Wrapping It Up
There you have it—a complete guide to setting up a remote IoT VPC network using Raspberry Pi and AWS Free Tier resources. By following the steps outlined in this article, you can create a secure, scalable, and efficient IoT system that meets your needs.
Now, it's your turn to take action. Start experimenting with your setup, and don't hesitate to reach out if you have any questions or run into issues. Share your experience in the comments below, and let's keep the conversation going!
Remember, the world of IoT is full of possibilities. With the right tools and knowledge, you can create amazing projects that make a real difference. So, what are you waiting for? Get out there and build something awesome!
Data sources: AWS Documentation, Raspberry Pi Official Guides, IoT Security Best Practices.